Using solar panels in your home is beneficial for the environment.
Sometimes, you need a 12-volt battery for your everyday work, and Here I want to give you information about how to connect a solar panel to a 12 volt battery.
In solar panels to a 12-volt battery connection, many of you will have a problem with this connection.
I have written this article for people like you who have complete information about a solar panel to a 12-volt battery connection.
Here are some steps to get complete information on this topic.
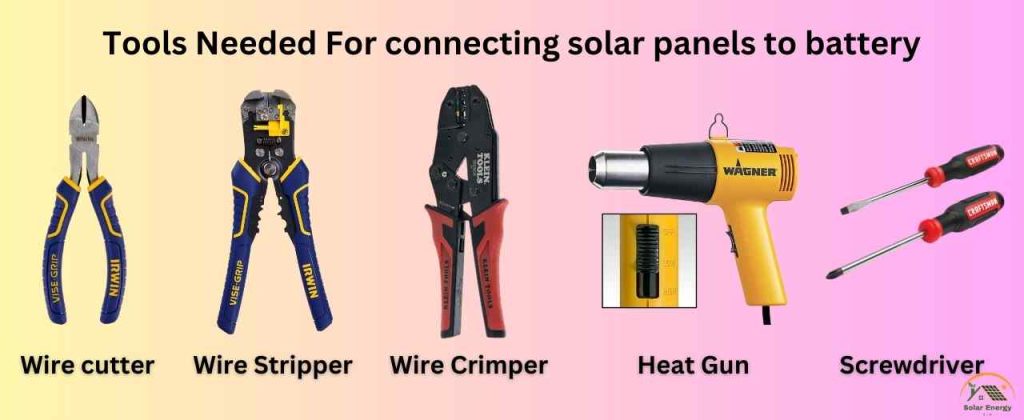
First, we need information about some tools and materials needed for this connection.
Equipment and Tools List
This issue provides complete information on what tools and equipment you need to use a solar panel to charge your 12-volt battery.
This information lets you connect your solar panel with a 12-volt battery at home.
The following are some tools to understand.
Equipment
- Solar Panels
- Electrical wiring diagram
- Solar Inverter
- Solar Charge Controller
- Solar Raking
- AC Breaker
- AC disconnect and fuse
- 12 Volts Battery
| No | Equipment | Purchase |
|---|---|---|
| 1 | Solar Panels | Check Here |
| 2 | Electrical wiring diagram | Check Here |
| 3 | Wires | Check Here |
| 4 | Solar Inverter | Check Here |
| 5 | Solar Charge Controller | Check Here |
| 6 | Solar Rack | Check Here |
| 7 | AC Breaker | Check Here |
| 8 | AC disconnect and fuse | Check Here |
| 9 | 12 Volts Battery | Check Here |
Tools
If you want to read detailed information about all the required material for connecting a 12-volt battery, then you can read this after the step-by-step guide.
How to Connect a Solar Panel To a 12-volt Battery? Step-By-Step Guide
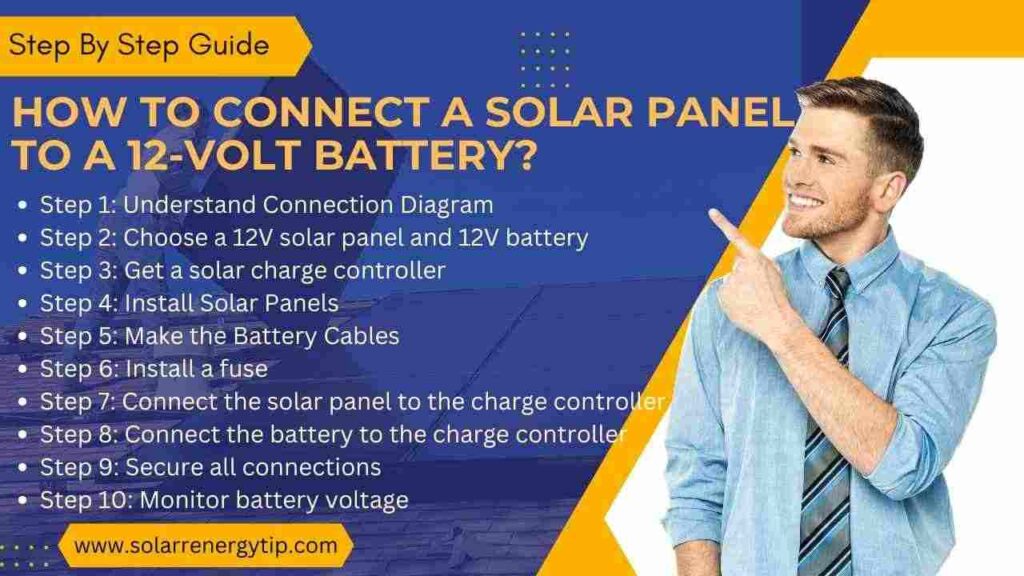
All you need to do in this connection is to connect the solar panel and the battery to other components via wiring.
First, we need to know that solar panels usually cannot connect solar panels directly to batteries.
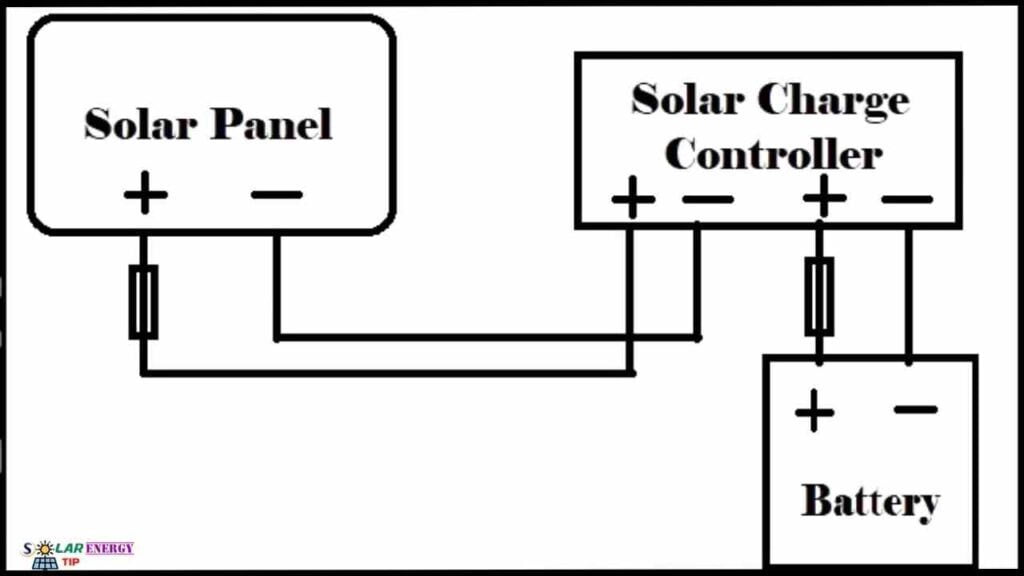
Step 1: Understand The Solar Panel and 12V Battery Connection Diagram
It’s critical to realize the following
Step 2: Choose a 12V Solar Panel and 12V Battery
When picking equipment, choose a solar panel made in the 12-18 volt range – that’ll give enough juice to charge a 12V battery. 🔋
For the battery itself, read the label to be sure it’s built for 12-volt systems.
There are lots of battery types out there, so double-checking the voltage saves headaches down the road.
Matching the panel and battery voltages keeps things running smoothly.
Take a minute upfront to ensure your gear is compatible, and you’ll be cruising in no time.
Step 3: Get a Solar Charge Controller
A charge controller is like a traffic cop for electricity, directing and controlling the flow between the solar panel and battery.
It prevents overcharging, which can damage batteries. Get a controller that matches the voltage of your panel and can handle its amperage, too.
It’s a small upfront cost that saves money by keeping your batteries healthy. Read the controller and solar panel specs to ensure a good match.
Taking the time to get the right controller will keep your system running smoothly for years.
Step 4: Install Solar Panels
Solar Power System The first step is to install solar panels on your terrace, at home, or in a place where the maximum amount of sunlight is available.
Here’s information about how to install solar panels yourself…
First of all,
Your solar panels should be placed where they get the most sunlight and enjoy long peak hours.
Then, you must build a platform to attach solar panels using aluminum rails.
After placing the solar panel on the platform, wire it in series or parallel. Slice boxes and fuses secure this solar power system.
Step 5: Make the Battery Cables
Rather than buying pre-made battery cables, one can save money by DIY-ing the solar system wiring.
After calculating the needed cable length and fuse size, cut the wires to length and add lugs to both ends.
Heat shrink tubing should insulate the connections for safety.
Attaching the fuse holder to the shorter positive wire will protect it from shorts.
Then, you must choose the correct wire to connect to the solar charge controller and your 12-volt battery.
Generally, you can use a 3, 6, or 8-gauge or larger wire to connect the battery to the solar charge controller.
Step 6: Install a fuse on the positive wire from the solar panel
Fuses play a critical safety role in solar electrical systems. They prevent excessive current flow that can damage wires and equipment.
Attach an appropriately sized fuse holder and fuse in line with the positive wire connecting the solar panel to the charge controller.
Wire the positive terminal on the charge controller using a 15A fuse. Also, wire the two negative terminals to the charge controller.
Then, using a 20A fuse, wire the second positive charge controller terminal.
Step 7: Connect the solar panel to the charge controller
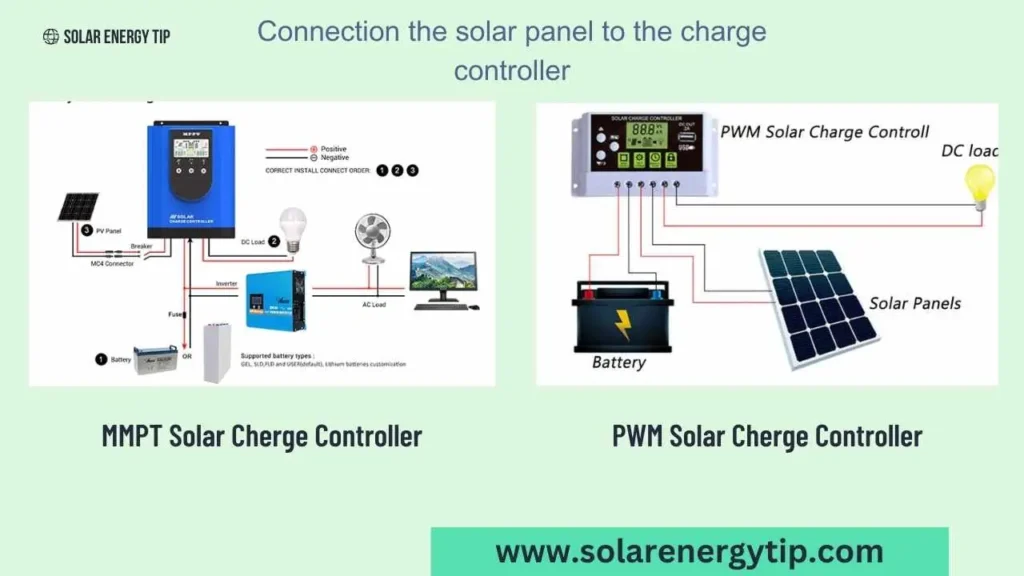
Hooking up the solar panel to the charge controller is straightforward. Just match positive to positive and negative to negative.
Then, using an MC4 connector cable adapter, connect the panel’s negative terminal to the charge controller’s fused positive terminal.
Next, attach the solar panel wires to the controller. The panel’s output gets regulated before reaching the battery.
It’s that simple – with just a red and black wire, you’ve linked up the key components to enable charging.
Double-checking polarity prevents any risky reversed connections.
Step 8: Connect the battery to the charge controller
Connecting the battery to the charge controller follows the same polarity pattern.
Take the red positive wire from the battery and attach it to the positive terminal on the controller.
Then, clip the black negative wire from the battery to the negative terminal on the controller.
Matching red to red and black to black allows current to flow correctly from the solar panel to the battery.
Double-check that those connections are tight to prevent power loss. With just a few secure connections, your battery can safely integrate into the solar charging system.
“Once everything is tightened down, double-check connections.
Getting the flow direction right ensures the controller can do its job, sending current one way from the sun to the battery.“
Step 9: Secure all connections
Making sure all the wiring connections are fully secured completes the installation.
Use cable ties or clips to organize loose wires and prevent tangles.
Then go back and check that each terminal or splice is tightened down completely – loose connections can arc, overheat, or cut power flow.
Tug gently on the wires to confirm everything is snug.
Step 10: Monitor battery voltage
Keep an eye on battery voltage to ensure your system is charging correctly.
Use a voltage meter to test it occasionally, especially after setting up the solar connection.
A full 12V battery will read around 14V. Higher than that risks overcharging and boiling the battery.
Lower than that indicates a charging issue – double-check connections in that case.
Taking a minute for occasional voltage checks gives peace of mind your solar power is being smoothly collected and stored for later use.
The following video shows how to connect to a solar charge controller and a 12-volt battery.
Required Material For Solar Panel Connection to Battery
Solar Panel
A solar panel is one of the first tools needed to charge a 12-volt battery. Then you may wonder what size solar panel would be needed to connect a 12-volt battery.
To fully charge a 12-volt battery, you will need a 100-watt solar panel that can generate up to 500 watts of power if the sunlight is on for five hours.
It controls the voltage and current going to the battery from the solar panel. Most 12-volt panels have about 16 to 20 volts. If not regulated, it can damage the battery due to overcharging.
The number and location of solar panels depend on the following reasons:
- Your energy needs
- Peak sunlight over the space of the solar panel
- The area of the roof is enough to consume
- Efficiency rating of solar panels
- Climate
Most batteries require about 12 to 14.5 boards to charge fully. There are three types of solar panels depending on the installation. You can use these three solar panels to connect a 12-volt battery.
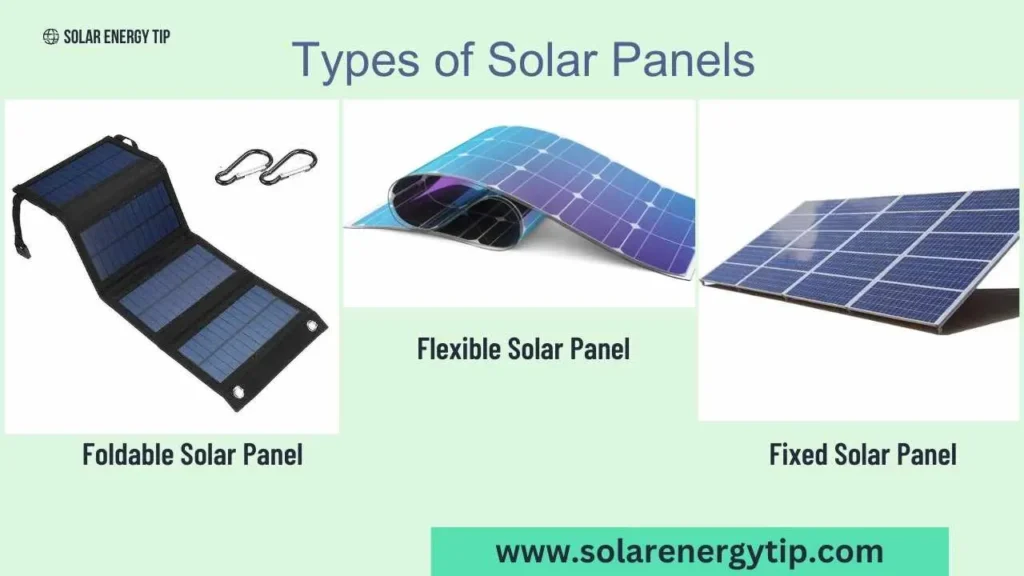
1. Foldable Solar Panel
By folding the foldable solar panel, you can take it anywhere and connect your 12-volt battery to it.
You can charge your 12-volt battery with this foldable solar panel if you are in a campaign or on a trip and you need electricity in such a place.
It’s up to you how many large solar panels you need, depending on your needs. The maximum rating should be up to 80 watts. These solar panels also have a solar controller to charge a 12-volt battery.
You cannot charge a 12-volt battery if you choose a smaller solar panel. Why? Small solar panels can generate 6 to 30 watts.
Here is a good foldable solar panel product that I suggest to you per my research.
ROCKPALS 120W Portable Solar Panels
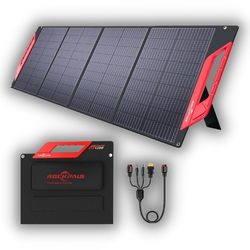
- Huge power for output
- Fully Foldable
- Portable
- Water Proof
2. Fixed solar panel
As you may know from this name, this type of solar panel cannot be bent.
If you have a flat surface, you can install a fixed solar panel on it. It allows you to connect the 12-volt solar battery you have.
This type of fixed solar panel also requires a charge controller to protect the solar battery. This type of solar panel is fitted to the surface once and produces continuous electrical energy.
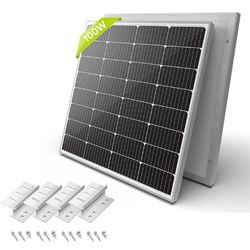
- New Design Style
- Easy Installation
- Maximum power output
- warranty about limited material and workmanship
3. Flexible solar panel
Flexible solar panels can also bend up to 30 degrees, and this type of solar panel is excellent for uneven surfaces.
Flexible solar panels are made of ultra-thin wafers designed to get solar energy. Unlike conventional solar panels that are very heavy and flexible, solar panels are heavy and have a thickness of only a few micrometres.
It is essential to choose a solar panel to know how to connect a solar panel to a 12-volt battery.
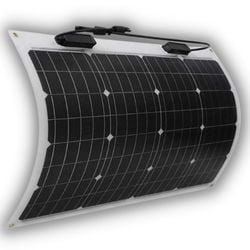
- Super flexible
- Thin Lamination
- Light Weight
- Durable
Electrical wiring diagram
If you want to get complete information about connecting a solar panel to a 12-volt battery while sitting at home, you will need an electrical wiring diagram.

It requires an electric wiring diagram as this is a circuit plan, and the circulation of electrical energy helps to get a clear picture.
The electrical wiring diagram also gives you an estimate of the size and length of the wire, and accordingly, you will get an estimate of its purchase.
Wires
Wires are the basic material for connecting solar panels, batteries, and other parts in a solar power system.
You all know that,
A solar panel system has many components, such as solar panels, batteries, charge controllers, and inverters. All of these require wires of the right size and capacity to connect.
Solar Inverter
Solar panels need a solar inverter to connect to a 12-volt battery. Solar inverter price varies. Solar inverters come in many types. Solar power inverters are fitted inside a solar system to charge a solar battery.
The electrical energy generated by the solar panel can be used only with one aid. That aid is a solar inverter which helps you to convert the electrical energy generated by the solar panel from DC to AC.
You can then use the electrical energy generated in this way in your home or the utility grid.
Types of solar inverters such as,
- Solar off-grid inverter
- Solar on grid inverter
- Solar hybrid inverter
Solar off-grid inverter
Off-grid solar inverters convert electrical energy from photovoltaic solar panels and store them in batteries.
Solar on grid inverter
On-grid Solar means your solar power system is connected to your local utility grid. In a solar grid system, you use a grid solar inverter.
Keeping the solar power system connected to the grid is advantageous as it does not require an expensive battery backup system to store additional energy.
Solar hybrid inverter
The main task of a solar inverter is to convert the DC power generated from the solar panel into useful AC power.
Even if we use a hydrate solar inverter, you can transfer the energy to the solar battery and send the surplus energy to the grid line.
A hybrid solar inverter is important in a residential solar + storage system. You can install your home solar power system by choosing the best hybrid solar inverter available.
This type of inverter is commonly used in remote areas where people live on a completely off-grid solar system.
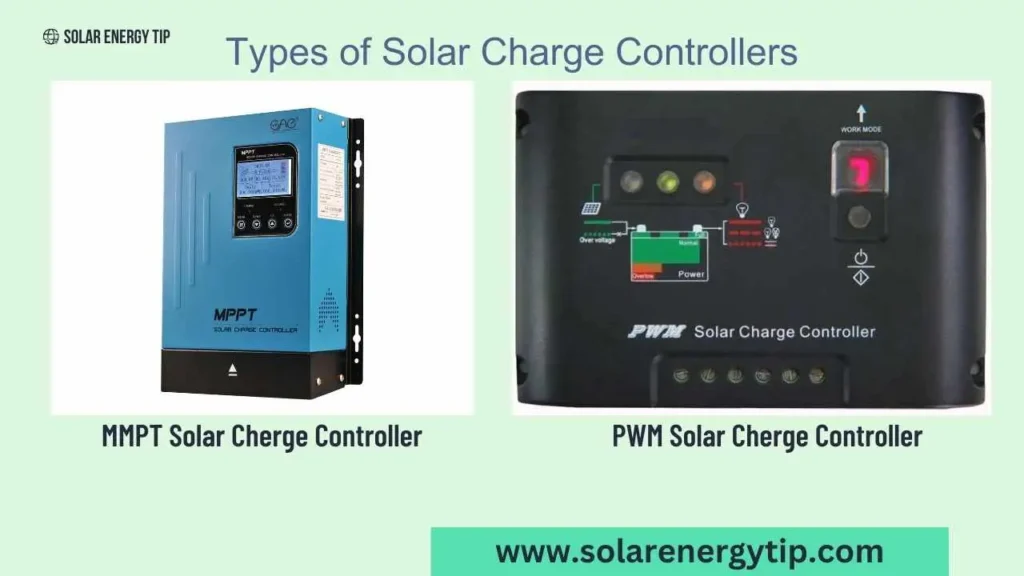
Solar Charge Controller
A solar charge controller is a type that manages the electrical energy going into a battery.
This solar charge controller ensures that deep-cycle batteries are not overcharged throughout the day.
There are two types of solar charge controllers,
- PWM Solar Charge Controller
- MPPT Solar Charge Controller
Solar Rack
Solar panels are not directly connected to the roof; solar panels are mounted on the panel racking above the roof, which is connected to the roof and is connected to the phone with no degree of sunlight.
Degree angles are fitted in the solar ranking to receive maximum sunlight.
A solar ranking system is an excellent tool for organizing solar panels.
AC breaker
The AC breaker is required to power and transport the AC of the solar power system, and you need to check its compatibility as there are also different types of mountain circuits.
AC disconnect and fuse
Generally, two types of equipment are required for safety considerations for electric power for your home or offices. The first is AC Disconnect, and the second is a fuse.
12 volts battery
A 12-volt battery is a tool for getting information on connecting a solar panel to a 12-volt battery.
You can use a 12-volt battery to get power anywhere you want, and it is rechargeable, so you can get electricity by connecting it to a solar panel.
We will get information about connecting a solar panel to a 12-volt battery.
Read Also:
FAQs
Will a 25-watt solar panel charge a 12-volt battery?
The Eco Power 25-watt polycrystalline module is for 12-volt battery charging and more. It is ready to provide cheap electricity. Draw it to the sun, and it runs. The panel produces DC voltage.
What size solar panel do I need to charge a 12V battery?
A 12V battery requires a minimum of 13.6 volts to charge, so in bad conditions, a solar panel needs to output at least 13.6 volts.
This means a 12V solar panel can output around 17V or more in perfect conditions.
Can I connect a solar panel directly to a battery?
No, Solar Panel Direct You cannot connect to a solar battery because it requires a charge controller that controls the electrical energy generated by the solar panel.
Conclusion
Based on all the analysis and guidance mentioned above, you will have gained enough knowledge on how to connect a solar panel to a 12-volt battery.
We have seen the list of tools and equipment used in this connection and the information about the solar panel with a 12-volt battery in five steps of connection.
So by following these steps, you can connect the solar panel to a 12-volt battery. You can do full wiring, but in the meantime, don’t forget to check each component after wiring.
This way, you can enjoy using an eco-friendly power generator.